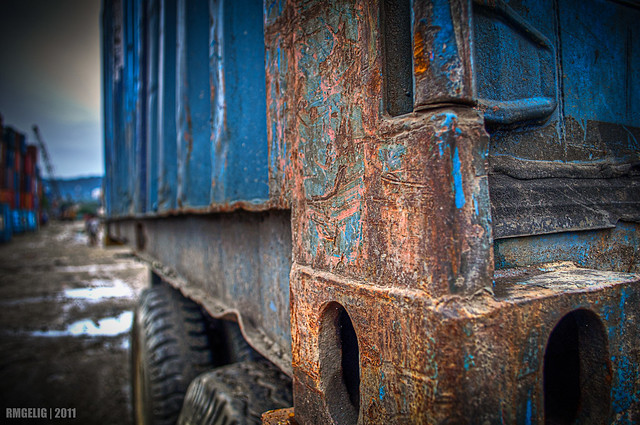
Friday, September 28, 2012

Quick Tips: Turn Off In-camera Noise Reduction

In-camera noise reduction is now a default feature in existing and new digital slr's.  It is quite a useful little tool to make your photos better.  To me it is quite a nuisance because it slows the camera down.  The camera would take a bit of time processing to reduce the noise and in photography, every moment counts.  That is why I turn noise reduction off.

2 types of noise reduction

Most dslr's have two types of noise reduction: a High ISO noise reduction and a Long exposure noise reduction.

High ISO Noise Reduction

In most dslr's, High ISO NR will be applied on ISO800 and above and only on JPEG files will NR be applied.  High ISO NR will not be applied on RAW.

The thing I noticed when this option is turned on is that, in continuous-shot mode, the camera's image buffer will be lessened.  Instead, for example, a 20 image buffer at ISO400; when ISO is adjusted to 800 above, the image buffer goes down to about 10 images.  Then, the camera's frame rate slows down or, at times, disables the shutter because the camera is currently busy processing.

But when High ISO Noise Reduction is turned off, the camera can capture roughly 20 images before the buffer fills up.  This is why I turn this option off.


Long Exposure Noise Reduction

This option commonly uses a dark frame subtraction.  Basically, the camera takes an image with the shutter closed, a dark frame.  A dark frame is essentially an image of noise in a sensor and can then be subtracted on subsequent image to correct the noise.  

Now the kicker, if you take a 30 second exposure with this noise reduction option turned on, the camera would take another 30 seconds to capture the dark frame; giving you roughly 60 seconds (or more counting the NR process time) before you can take another shot.  

In landscape photography, every second counts especially if your shooting sunrise or sunset.  If every shot you make takes two times longer the shutter speed then you'd miss a lot of scenery.

This is why I turn this option off too.

If I turn off noise reduction feature, my images would be noisy.

Yes they would...

You can always reduce the noise on post.  Lightroom and Adobe Camera Raw have effective noise reduction features.  These are found in the Details section, under Noise Reduction.

There are also lots of third party noise reduction plugins for Photoshop and Lightroom.  So your images will be noise free.

I also find the images captured with NR off a bit sharper compared to images where in-camera NR is applied.


Thursday, September 20, 2012

HDR - Part 3: Importing and Processing

The Final Image


HDR post processing isn't that much difficult.  It really boils down to the creativity of the photographer on how to express the image.  I sometimes like it grungy but most of the time I like it realistic and not too saturated.  I often convert it to black and white.

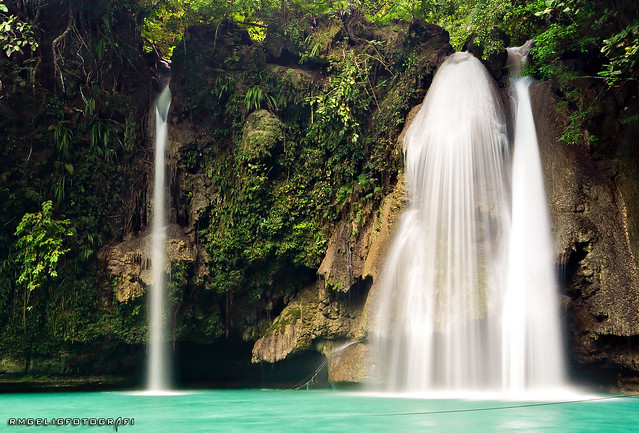
I am using Photomatix to show this example.  These will be the images I'll be merging to HDR.


Import/Export the Images

I use Lightroom and import the images there.  From Lightroom, I export it into Photomatix.


Select the three images, then export to Photomatix Pro, as seen on the image above.


Then you'd see this dialog box (above) with different settings.  Since the three images were taken handheld, Align images should be checked.

Ghosting refers to motion blur, I always check this to minimize motion blur on some objects.

And of course, reduce noise is checked for basically reducing noise.

Then export.


This is the Photomatix Pro window.  As you can see, the result is pretty much ok.


Photomatix Settings

This is the adjustments panel in Photomatix Pro.  I won't describe each setting but you can point to a setting and a description will appear on the bottom (in this image, the Lighting Adjustment is described).  I'll just be focusing on the settings that I find essential.

Strength

Controls the amount of overall effect of the succeeding settings.  If you like the grungy effect, set this to 100%.

Color Saturation

Controls the overall saturation of the image.   If you wish to go black and white, set this to 0.

Luminosity

Controls the compression of tonal range.  If you move the slider to the right, it boosts shadow detail and brightens the image.  Opposite effects if slider is moved to the left.  

Detail Contrast

Controls the overall contrast of the image.  Moving the slider to the right increase contrasts, gives a sharper look to the image and darkens the image a bit.

Lighting Adjustments

Controls the overall "look" of the image.  For a natural look, move the slider to the right.  For a more painterly, surreal look, move it to the left.

White and Black Point

These two controls the highlights and shadows of the image.  I also controls contrast.

Gamma

Controls the mid tones.  Darkens or brightens the image globally.

Micro-smoothing

Controls small detail enhancements.  This tends to minimize noise, especially in the sky.  For a grungy look, set this to zero.


Quick Tips

Here are a few tips on processing hdr.  I like a natural, detail, and a little bit grungy look in HDR images.  Here's my adjustment flow

  1. Start with the default present on the photomatix pro.  The default present gives out a decent result for a natural look.  Don't forget after merging you can enhance the image in Lightroom and Photoshop.  The default present is always my starting point.
  2. Try to get a natural detailed look.  Adjust Strength to 100, boost Detail Contrast (to a max of 80) and add a little Luminosity.
  3. To lessen dark shadows, increase White Point and move Gamma to the right.
  4. Add a little Black Point to increase contrast.
  5. Add a little Micro-Smoothing to minimize that grungy effect.  And increase Smooth Highlights to preserve the sky.
  6. Add a little Lighting Adjustment (to the right).
  7. Now to get that natural look, decrease Strength to about 80.

Blending these settings takes time and practice.  Move the sliders to it's max and minimum to see how it affects the image then slowly adjust to your liking.  There is no right or wrong in HDR processing. you have the creativity freedom to do what you want your final image is.


Re-import to Lightroom

After adjusting the image in Photomatix, hit Save and Re-import.  The final image will be re-imported to Lightroom for further enhancement.

Once in Lightroom, you can adjust the global Exposure, Contrast and Color of the image.  If you go grungy, increase Clarity.

I usually apply Nik's Viveza plugin and adjust Structure, Shadows and Brightness. 

You may further enhance the image by exporting it to Photoshop.


Photoshop Post Process

In Photoshop you may enhance the image further.  Usually in Photoshop, I just apply my watermark.


Final Note

This is only a basic tip on HDR processing.  Try to experiment on the different settings in Photomatix and see if you like the effect.  I sometimes just apply the Default Present in Photomatix and enhance the image in Lightroom and save the image.  Like I said, it takes time and practice.  Remember, every image is different; so try to adjust the settings in Photomatix.

Lightroom and Photoshop post processing isn't necessary but it does enhance the image further.


HDR - Part 1: Capturing Images
HDR - Part 2: HDR Software


HDR - Part 2: HDR Software

There are a number of HDR software.  HDRsoft Photomatix Pro 4, Nik HDR Efex pro 2 and Adobe Photoshop HDR Pro are some of the more popular software for HDR.


HDRSoft Photomatix Pro 4

Photomatix is probably the most popular HDR software.  This is what I use when rendering HDR images.  It has lots of options to adjust the image.  Creativity's the limit when it comes to the options provided by Photomatix.  

It has a plugin for Lightroom which is great for Lightroom users.  You can directly export the images from Lightroom to Photomatix then re-import after tone mapping.


Nik HDR Efex Pro 2

I enjoy plugins from Nik Software and HDR Efex Pro 2 in one of them.  HDR Efex Pro also has a lot of options to choose from.  What makes HDR Efex Pro interesting is it's U Point Technology wherein you may control the amount of effect on a specific area of an image.  It also has a plugin for Lightroom and it also integrates with Photoshop.


Adobe Photoshop HDR Pro

Photoshop is the most popular photo editing software and it has built-in HDR rendering application.  It has lesser options but does a pretty good job creating HDR.  


What ever software you choose, remember when creating HDR images, the sky's the limit when it comes to creativity.


HDR - Part 1: Capturing the images
HDR - Part 3: Importing and Processing


HDR - Part 1: Capturing the images

Perspective


What is HDR? How do you take these kinds of images? What is required to shoot such image? Read on and learn a few tricks on shooting HDR.


What is HDR?


HDR stands for High Dynamic Range. 


" HDR is a range of methods to provide higher dynamic range from the imaging process. Non-HDR cameras take pictures at one exposure level with a limited contrast range. This results in the loss of detail in bright or dark areas of a picture, depending on whether the camera had a low or high exposure setting. HDR compensates for this loss of detail by taking multiple pictures at different exposure levels and intelligently stitching them together to produce a picture that is representative in both dark and bright areas. "  ~Wikipedia~

Simply put, HDR shows the bright, mid, and dark areas of an image.  It is a way to mimic how our eyes sees the world.  In HDR, the image can be processed exaggeratedly thus making the image more like a painting.  Nevertheless, HDR is like an art.

How to shoot HDR?

To make an HDR image, you'll need to have 3 images of the scene at different exposures.  This is where the auto bracketing feature of dslrs are used.  Typically you'll need a correctly exposed image, an overexposed image and an underexposed image.  

Here are some tips


Set your camera to shoot continuously or burst shot.  This needs to be set so as to avoid or minimize any motion blur, especially if your shooting with objects that may sway with the wind, like trees or plants. 

If your camera has a mirror lock or delay exposure, activate it.  This reduces blur from shutter movement.

If possible, mount your camera on tripod to minimize blur, especially indoors.

Use a shutter cord trigger to further minimize blur from pressing the shutter button.


Now for the different image exposure:

Auto way


Set your auto bracketing to bracket exposure (AEB) and  set it at 2EV interval.  Some cameras offer features like the number of images you'd like to bracket, but the default is 3 images.  You may go for more than 3, if your camera allows it, but just start with 3.

Manual way


If your camera doesn't offer an auto bracketing feature or you just want to manually adjust the exposure, then you may set the exposure manually.  You may: 1.) set exposure by adjusting the EV (exposure value) to +2EV and -2EV and using aperture priority mode; or 2.) manually adjust the shutter speed to 2 stops up and 2 stops down.  Of course, you can't use the continuous mode when doing manual adjustment.


Now take the 3 differently exposed images.   Check to see if you got: 1 correctly exposed image, 1 underexposed image and 1 overexposed image.

These 3 images will be used to process the HDR image by using an HDR rendering software like Photomatix, HDR Efex or in Photoshop.  Now you are ready for processing.


HDR - Part 2: HDR Software
HDR - Part 3: Importing and Processing


Thursday, September 13, 2012

Quick Tips: What filter size should you buy?

Here's a quick tip on purchasing filters.  This doesn't concern UV or clear filters but for other photographic filters such as neutral density or CPL.  For UV filters buy the size of your lens thread.

Tip:

Buy the largest filter size, commonly a 77mm thread, and use a step up ring.

What are Step Up Rings?

Step up rings are like adapters from a smaller sized thread to a larger thread.  Say you are using an Nikkor 18-55mm lens, which has a 52mm thread.  Go buy a 52-77mm step up ring so you can attach a 77mm filter on your 18-55mm lens.

Why buy a 77mm and step up ring?

The answer: economical.  If you are serious in photography and love landscapes, eventually you'll be buying an ultra wide angle (UWA) lens.  And common UWA's have 77mm threads.  

Here's the idea.  

Say your current lens is a Nikkor 18-55mm and you want to try CPL filter for landscapes.  So you go buy a 52mm CPL filter, which costs around say $50.  You enjoy your 52mm CPL and soon you decide to buy a Sigma 10-20mm f4-5.6.  Now if you do purchase the Sigma, then your $50 CPL would be junk because it won't fit on the Sigma, which has a 77mm thread.  So you'll have to buy a 77mm CPL which would cost around say $80.  Your 52mm CPL is now a $50 paper weight.

But if you buy a 77mm CPL, for $80, and a step up ring, commonly at $12, then you've only spent $92, economical no?  and once you do buy an UWA, you don't have to buy a new filter.

Also,

"This saves a lot of fiddling when you are out shooting and trying to swap filters around." ~Ken Rockwell


Wednesday, September 12, 2012

What are lens filters?

Lens filters are accessories that are attached onto the front of the lens.  These attachments may modify the image recorded unto the sensor.  The filters are typically circular but there are also square filters commonly used by landscape photographers.

The diameter of the filter will depend on the diameter of the lens' filter thread.  The filter thread size may be found marked on the lens usually with a Φ symbol.


What are the types of lens filters?

Here are common filters usually used by photographers.

Clear and UV Filters

These type of filters are probably the most common filter.  Every lens should have this filter.  Clear filters are typically just plain glass.  A UV filter is used to reduce haze from ultraviolet light.  

These filters are basically used for protecting the front element of the lens from dust and scratches.  It's more economical to replace the filter than to replace the lens.


CPL or Circular Polarizers

A polarizer filters out light with a particular direction of polarisation. Basically it reduces the amount of reflection from a reflective surface.  CPLs can darken the sky, makes the sky bluer.  This filter is commonly found in a landscape photographer's bag.


Kawasan Falls
Captured using an ND8 filter


ND or Neutral Density Filters

These are solid dark filters.  These are used to allow for long exposures.  It is used by landscape photographers to create motion blur especially in water.  There are different grades of ND filters.  Common is an ND8 filter, or 0.9 or a 3 stop ND filter.

ND filters come in circular and square filters.


GND filter

GND or Graduated Neutral Density

A GND filter is neutral density filter with different attenuation at different points, typically dark on one side and gradually clears on the opposite side.  It is used to balance out the exposure of a scene, like when the sky is too bright compared to the ground.

These are commonly square, but there are circular GNDs too.

DSC_4603
IR Photography by Michael Ocaña


IR or Infrared Filters

IR filters capture infrared light.  These creates a dreamy, false color images.  Digital images captured by IR filters are post processed through photo editing software like Adobe's Photoshop to produce that dreamy effect.


What are square filters?

A common filter is a threaded round filter and screws on directly onto the lens.  A square filter needs to have a holder set in order to be mounted.  

A holder set consists of two accessories: a thread adapter ring and a filter holder.

The thread adapter should have the same diameter with the lens' filter thread; much like a circular filter.

The filter holder is attached by sliding it on the thread adapter.  It will lock on place and is freely rotatable.  A Cokin holder may hold 3 filters at once.

A square filter is then attached to the holder by, again, sliding it in the holder mount.  Since the holder can accommodate 3 filters,  it is up to the photographer's creativity to mix different filters to get the desired effect.

There are different sizes of square filters and it's corresponding holder.  Common sizes are 85mm (Cokin P-series) and 100mm (Cokin Z pro).

A square holder set may differ with different brands but the function is the same, to hold square filters.

Graduated Color Square Filter

These filters are like GNDs but instead of one side neutral density, it is one side color.  Common colors are graduated blue,  red, orange, green, and sunset orange.  These are used for creativity effects.

There are other types of filters but these are the common ones.  So there you have it, any more queries about lens filters?  Here are some links for you.

Photographic Filters
Cokin
Lens Filters Explained


Monday, September 10, 2012

Why Lightroom beats Bridge and Camera Raw

Here are 100 ways why Lightroom kicks Bridge's and Camera Raw's arse.   These are 100 video clips by Matt Kloskowski and Scott Kelby explaining why Lightroom is better than Adobe Bridge and Camera Raw.  It's quite entertaining and informative.

Here's the LINK.  Watch it, you may learn 100 things about Lightroom. :)


Wednesday, September 5, 2012

Photo Post Processing Software

Post processing software are programs or applications use to edit or process digital image files, taken from digital cameras.  There are a lot of these applications on the market right now but among those, these are the more popular ones.


Adobe Lightroom

Lightroom's interface and features was made for photographers.  The workflow is stream lined to handle hundreds of photos.  Lightroom's Library and Develop Module is fairly similar to Adobe's Bridge and Camera Raw, respectively.  But certain features in Lightroom are not available in Bridge and ACR (Adobe Camera Raw).

Lightroom is user friendly compared to Photoshop.  Most of Lightroom's tools, in Develop Module, are for correcting and adjusting exposure and contrasts.  Other tools are color correction, black & white conversion, crop and graduated filter, to name a few.  It even has healing and clone brush.  

For basic and global exposure, contrast and color adjustments, use Lightroom.


Aperture

For Mac users, there is Aperture.  It is more like Lightroom but has a different workflow.  Many Mac users say Apertures photo organization is better than Lightroom.

Which is better: Lightroom or Aperture?  It really depends on the photographer which features is best for his workflow.


Adobe Photoshop

When it comes to detailed retouching and editing, Adobe Photoshop is king.  Adobe Photoshop has been around since 1987.  Photoshop is probably the most popular when it comes to post processing software.  It is widely used in the photography community and graphic designers right now.  

It has tons of useful features that make photo retouching and manipulation a breeze.  It's use of layers is the most powerful feature this software can do.  It also has tons of 3rd party plug-ins to stream line your workflow.


Darktable

For linux users, there's Darktable.  It is designed based on Lightroom.  It is an alternative Raw processor for linux.  It has different modules for adjustments.  This is a great software for linux users.


Which ever software you use, it doesn't matter for as long as you enjoy the fruits of photography, the photos you've captured.


Monday, September 3, 2012

Photography blogs you definitely should read

Here are some photography blogs that you'd probably learn a thing or two.  


Digtal Photography School

Tones of photography, equipment and post processing tips.  dPs also have community forum of  photographers where you can meet and greet other photographers.  dPs also features useful ebooks by well known photographers.  


Lightstalking

Lightstalking is another photography resource blog.  It features photography tips, post processing techniques, links to other interesting photography blogs, and a bunch of photography stuff.  It frequently displays photos for different genres to inspire others to do better.

The Photo Argus

The Photo Argus, just like the other two, is a blog resource.  The Photo Argus also features Wordpress themes for photographers, mostly portfolio themes to flaunt your photos online.


There are more resource blogs out there but among these 3 I've shared, I bet you'll learn a lot. Feel free to comment and share more links to other resource blogs.


Saturday, September 1, 2012

Online Photo Sharing

Since we're talking about photography, I wonder, what are you doing with your photos?  Is it for personal use? or do you want to share and show it off.  I bet you're itching to show off some of those images to the world.  

Facebook has been a medium for communication and social media sharing.  You can upload videos and photos.  It is a means to show off your images to your friends.  There is one catch though.  Sometimes Facebook distorts or doesn't correctly display your images.. Sometimes.. Especially images which is extensively post processed.  


You can't share your Facebook images to online forums.  For you to share your images to forums, you'll need to join an online photo sharing website.


Here are a few free online photo sharing sites to note.


Flickr


Flickr probably is one of the popular online photo sharing site out there.  The best feature is it's Share button above your image.  Under the share button, are options on how to share your image, from a simple link (to share in Facebook) to basic html code (for sharing in blogs or website) and  BBCode which is used to share through online forums.  You can even choose how large you want your image be shared (for Html and BBcode only).


flickr share button
Here's what's under the Share button.


Hmm...Ok earthquake over, now back to blogging (8/31/2012 9:00pm Manila time).


Flickr service is free.  You may upload unlimited photos but only the recent 200 images will be shown on your profile (but not deleted, just hidden) and a 300mb upload limit per month.  Of course, Flickr has a pro version at 24.95USD per year which negates the upload monthly limit and shows all your uploaded photos.


Besides an online photo sharing site, Flickr is also, sort of an online social medium for photographers.  You can browse other peoples photos and comment.  You may create groups and add photos pertaining to that group.  It even has it's own Like button, the Favorite button (with a star).


This is my main online photo sharing site.  All of my images are stored here.


If you're starting out in photography, I suggest in opening an account in Flickr and share your photos.


Photobucket

Photobucket is another online photo sharing site.  Like Flickr, Photobucket has it's own community.  You may comment and Like on other member's images.  It also has a share mode with Html and, instead of BBcode, it only shows [IMG] code for online forums.

Unlike Flickr, Photobucket only has 2 options for size, the full size and a thumbnail version.


Photobucket also has a Pro version at 24.95USD per year.  Benefits of pro is no ads in your profile and an unlimited bandwidth (compared to free account which has 10GB/month bandwidth allocation).  Pro and free versions enjoy unlimited storage.


I only use Photobucket to store my miscellaneous images which I use for my personal blog.


Picasa Web Album
Picasa web album is from Google.  It has it's own community too.  Commenting and sharing are available.  You may choose the size of the image when sharing, which is a good thing, but it lacks the BBcode used for online forums.

Picasa web album has a 1gb storage limit for the free account.  There is an upgrade storage option with 25gb and 100gb at 2.49USD/month and 4.99USD/month, respectively.

I haven't explored much with Picasa.  I only use this storage for images found in this blog.


These are more online photo sharing services out there but these three are the only one's I've used.  If you don't have an online photo sharing account, open one now and share away.